DTaaS on Linux Operating System
These are installation instructions for running DTaaS application on a Ubuntu Server 22.04 Operating System. The setup requires a machine which can spare 16GB RAM, 8 vCPUs and 50GB Hard Disk space.
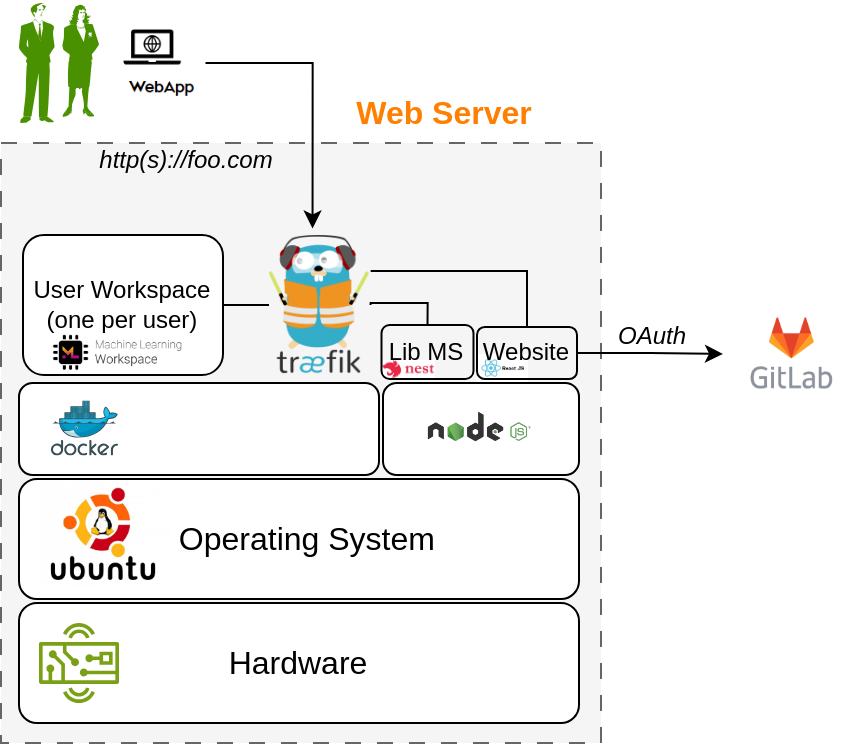
A dummy foo.com URL has been used for illustration. Please change this to your unique website URL. It is assumed that you are going to serve the application in only HTTPS mode.
A successful installation will create a setup similar to the one shown in the figure.
Please follow these steps to make this work in your local environment. Download the DTaaS.zip from the releases page. Unzip the same into a directory named DTaaS. The rest of the instructions assume that your working directory is DTaaS.
Note
If you only want to test the application and are not setting up a production instance, you can follow the instructions of trial installation.
Configuration
You need to configure the Traefik gateway, library microservice and react client website.
The first step is to decide on the number of users and their usenames. The traefik gateway configuration has a template for two users. You can modify the usernames in the template to the usernames chosen by you.
Traefik gateway server
You can run the Traefik gateway server in both HTTP and HTTPS mode to experience the DTaaS application. The installation guide assumes that you can run the application in HTTPS mode.
The Traefik gateway configuration is
at deploy/config/gateway/fileConfig.yml.
Change foo.com to your local hostname and user1/user2 to
the usernames chosen by you.
Tip
Do not use http:// or https://
in deploy/config/gateway/fileConfig.yml.
Authentication
This step requires htpasswd commandline utility. If
it is not available on your system, please install the same by using
You can now proceed with update of the gateway authentication setup.
The dummy username is foo and the password is bar.
Please change this before starting the gateway.
The user credentials added in deploy/config/gateway/auth should match the usernames in deploy/config/gateway/fileConfig.yml.
Lib microservice
The library microservice requires configuration. A template of this configuration file is given in deploy/config/lib file. Please modify this file as per your needs.
The first step in this configuration is to prepare the a filesystem for users.
An example file system in files/ directory.
You can rename the top-level user1/user2 to the usernames chosen by you.
Add an environment file named .env in lib for the library microservice.
An example .env file is given below.
The simplest possibility is to use local mode with the following example.
The filepath is the absolute filepath to files/ directory.
You can copy this configuration into deploy/config/lib file to get started.
React Client Website
Gitlab OAuth application
The DTaaS react website requires Gitlab OAuth provider. If you need more help with this step, please see the Authentication page.
You need the following information from the OAuth application registered on Gitlab:
| Gitlab Variable Name | Variable name in Client env.js | Default Value |
|---|---|---|
| OAuth Provider | REACT_APP_AUTH_AUTHORITY | https://gitlab.foo.com/ |
| Application ID | REACT_APP_CLIENT_ID | |
| Callback URL | REACT_APP_REDIRECT_URI | https://foo.com/Library |
| Scopes | REACT_APP_GITLAB_SCOPES | openid, profile, read_user, read_repository, api |
You can also see Gitlab help page for getting the Gitlab OAuth application details.
Update Client Config
Change the React website configuration in deploy/config/client/env.js.
Update the installation script
Open deploy/install.sh and update user1/user2 to usernames chosen by you.
Perform the Installation
Go to the DTaaS directory and execute
You can run this script multiple times until the installation is successful.
Access the application
Now you should be able to access the DTaaS application at:
References
Image sources: Ubuntu logo, Traefik logo, ml-workspace, nodejs, reactjs, nestjs