DTaaS on Two Vagrant Machines
These are installation instructions for running the DTaaS platform in two Vagrant virtual machines (VMs). In this setup, all user workspaces are run on server1 while all platform services are run on server2.
The setup requires two server VMs with the following hardware configuration:
server1: 16GB RAM, 8 x64 vCPUs and 50GB Hard Disk space
server2: 6GB RAM, 3 x64 vCPUs and 50GB Hard Disk space
Under the default configuration, two user workspaces are provisioned on server1. The default installation setup also installs InfluxDB, Grafana, RabbitMQ and MQTT services on server2. If you would like to install more services, you can create shell scripts to install the same on server2.
Create Base Vagrant Box
Create the dtaas Vagrant box.
An SSH key pair - vagrant and vagrant.pub - will have been created.
The vagrant file is the private SSH key and is needed for the next steps.
The vagrant SSH private key should be copied into the current directory (deploy/vagrant/two-machine).
This key is useful for logging into the vagrant
machines created for two-machine deployment.
Target Installation Setup
The goal is to use this dtaas vagrant box to install the DTaaS platform on server1 and the default platform services on server2. Both servers are vagrant machines.
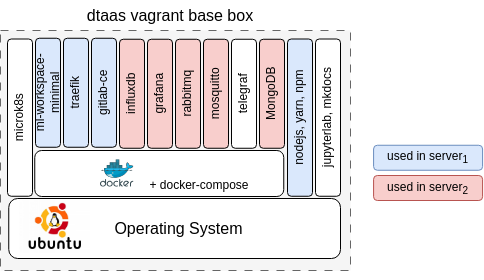
There are many unused software packages/docker containers within the dtaas base box. The used packages/docker containers are highlighted in blue and red color.
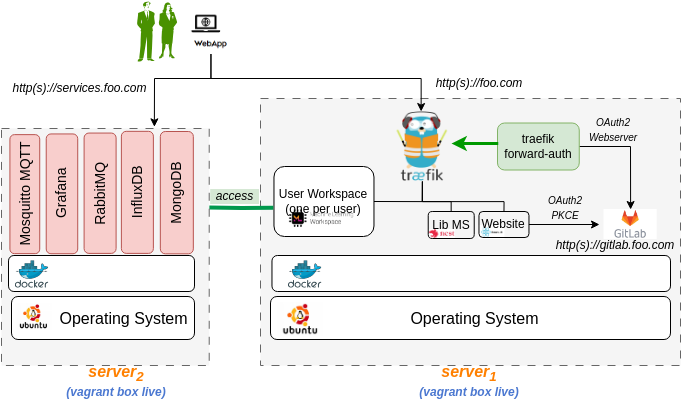
A graphical illustration of a successful installation is presented here.
In this case, both the vagrant boxes are spawed on one server using two vagrant configuration files, namely boxes.json and Vagrantfile.
Tip
The illustration shows hosting of GitLab on the same
vagrant machine with
Configure Server Settings
 A dummy
 foo.com and services.foo.com URLs
have been used for illustration.
These should be changed to the actual unique website URLs.
The first step is to define the network identity of the two VMs. For this, the server name, hostname and MAC address are required. The hostname is the network URL at which the server can be accessed on the web. The following steps should be performed to make this work in the local environment.
Update the boxes.json. There are entries one for each server. The fields to update are:
name- name of server1 ("name" = "dtaas-two")hostname- hostname of server1 ("name" = "foo.com")- MAC address (
:mac => "xxxxxxxx"). This change is required if you have a DHCP server assigning domain names based on MAC address. Otherwise, you can leave this field unchanged. name- name of server2 ("name" = "services")hostname- hostname of server2 ("name" = "services.foo.com")- MAC address (
:mac => "xxxxxxxx"). This change is required if you have a DHCP server assigning domain names based on MAC address. Otherwise, you can leave this field unchanged. - Other adjustments are optional.
Installation Steps
The installation instructions are given separately for each vagrant machine.
Launch DTaaS Platform Default Services
Follow the installation guide for services to install the DTaaS platform services.
After the services are up and running,
you can see the following services active within server2 (services.foo.com).
| service | external url |
|---|---|
| InfluxDB database | services.foo.com |
| Grafana visualization service | services.foo.com:3000 |
| MQTT Broker | services.foo.com:1883 |
| RabbitMQ Broker | services.foo.com:5672 |
| RabbitMQ Broker management website | services.foo.com:15672 |
| MongoDB database | services.foo.com:27017 |
Install DTaaS Platform
Execute the following commands from terminal
Set a cronjob inside the vagrant virtual machine to remote the conflicting default route. Download the route script and run the following command.
Please follow the instructions of regular server installation setup to complete the installation.
References
Image sources: Ubuntu logo, Traefik logo, ml-workspace, nodejs, reactjs, nestjs