Firefighter Mission in a Burning Building
During a firefighter mission, the oxygen level of each firefighter's Self Contained Breathing Apparatus (SCBA) must be monitored in the context of the mission.
Physical Twin Overview

Image: Schematic overview of a firefighter mission. Note the mission commander on the lower left documenting the air supply pressure levels provided by radio communication from the firefighters inside and around the burning building. This image was created with the assistance of DALL·E.
The following scenario is assumed:
- a set of firefighters work to extinguish a burning building
- they each use an SCBA with pressurised oxygen to breathe
- a mission commander outside coordinates the efforts and monitors the oxygen levels
Digital Twin Overview
This example implements a monitor that calculates how much time the firefighters have left before they need to leave the building. It uses these inputs:
- a 3D model of the building in which the mission takes place,
- pressure data from a firefighter's SCBA, and
- the firefighter's location inside the building
to estimate:
- the shortest way out,
- how long it takes, and
- how much time is left until the SCBA runs out of oxygen.
The remaining mission time is monitored, and the firefighters receive a warning if it drops below a threshold.

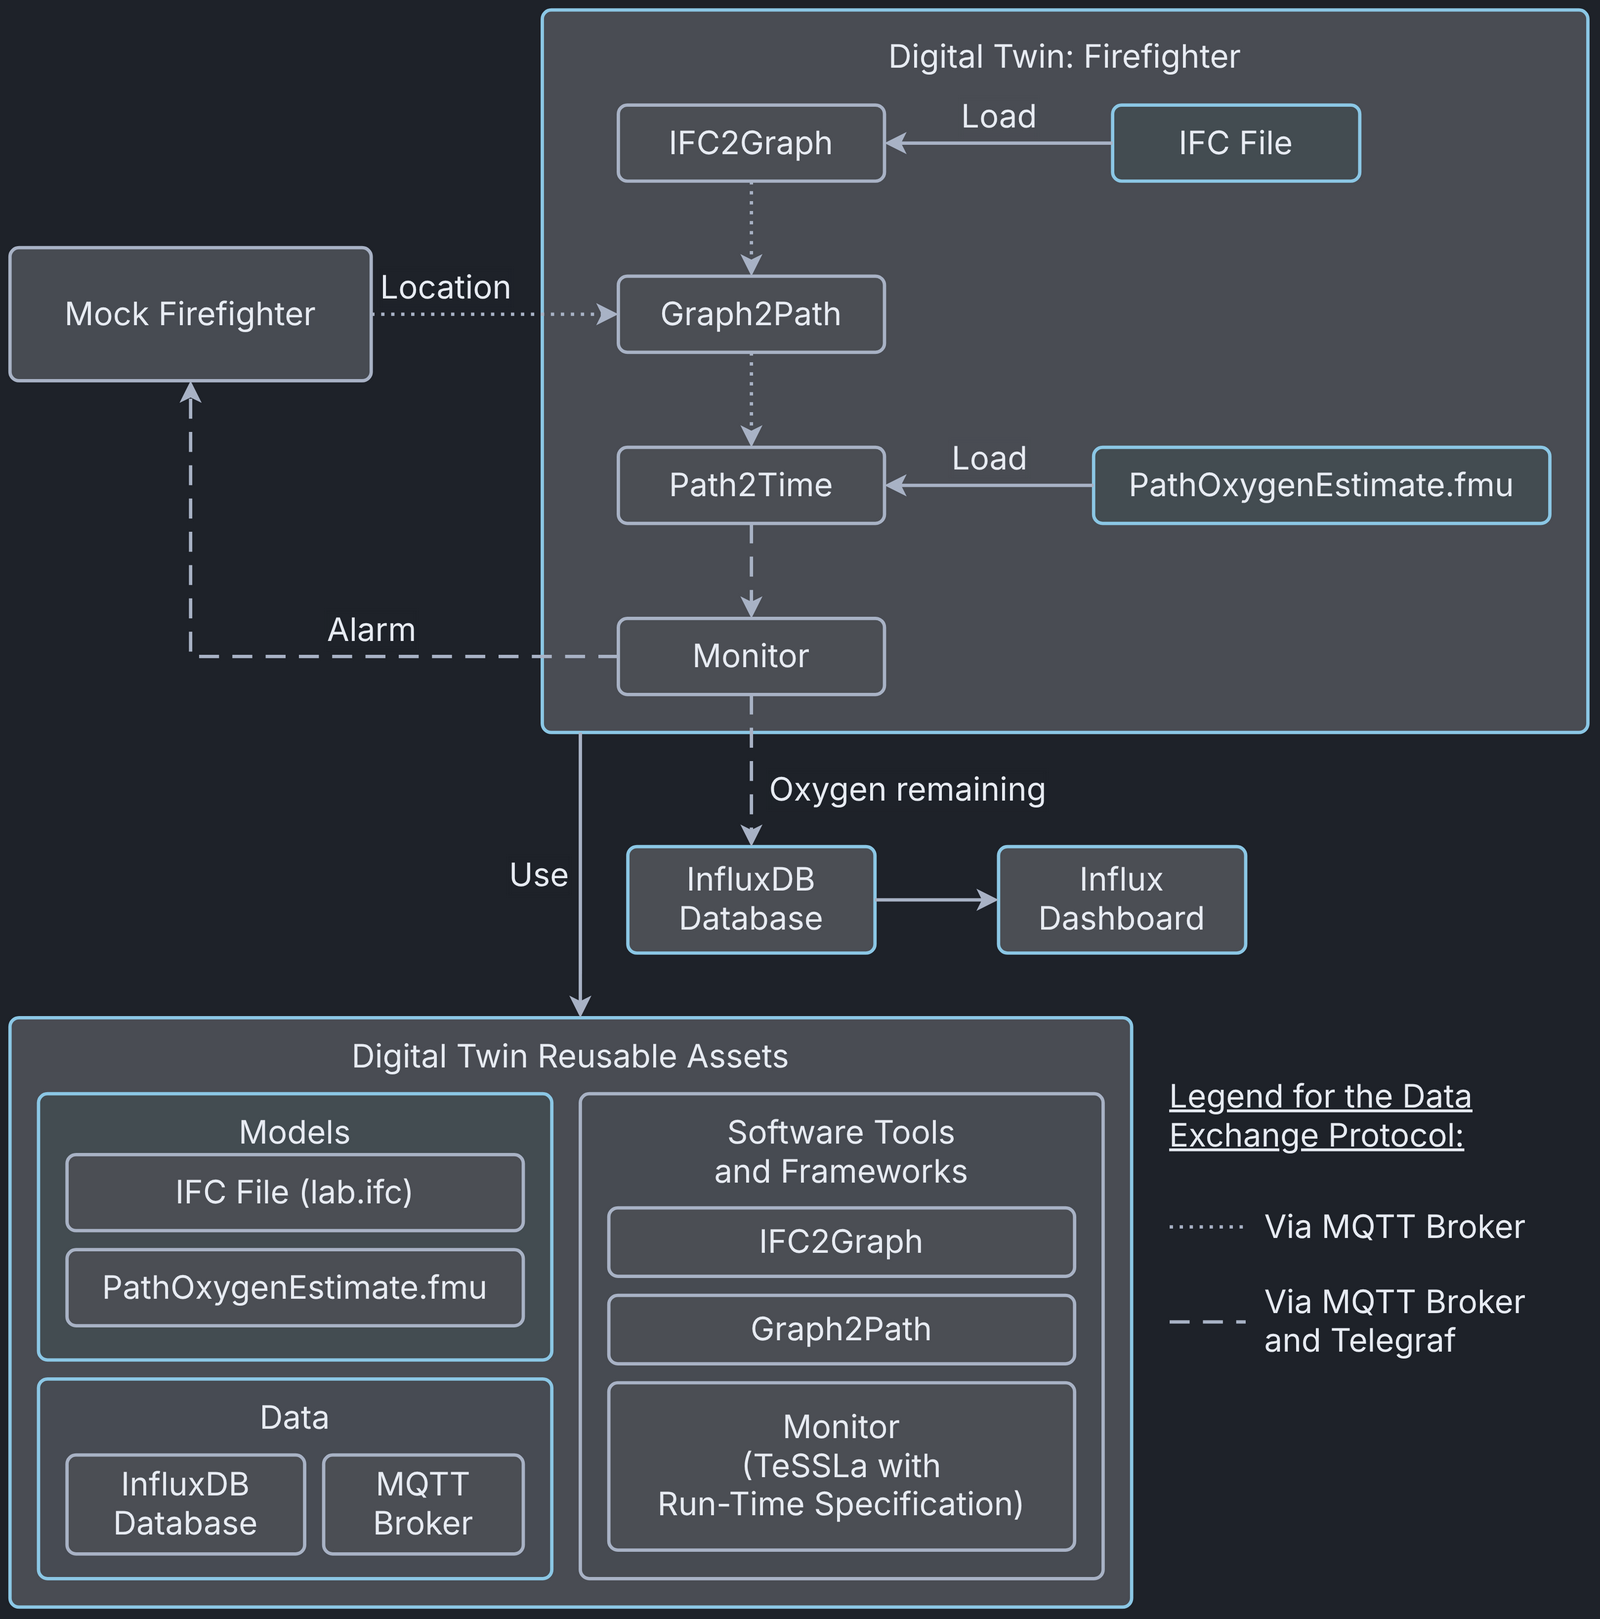
This example implements the paper Digital Twin for Rescue Missions--a Case Study by Leucker et al.
Quick Check
Before running this example, check that the following files are in the correct locations:
Digital Twin Configuration
All configuration for this example is in digital_twins/o5g/config.
The MQTT server needs account information. The topics have default values that let the DT read the sensor metrics of the mock physical twin and send back alerts.
This example stores data in InfluxDB, which needs the matching access details. Configure it as follows:
- Log into the InfluxDB Web UI.
- Note the org name (below the username in the sidebar).
- Create a data bucket in
Load Data -> Bucketsif one does not already exist. - Create an API access token in
Load Data -> API Tokens. Copy and save this token immediately, because it cannot be viewed again later.
Lifecycle Phases
The example covers these lifecycle phases:
| Lifecycle Phase | Completed Tasks |
|---|---|
| Install | Installs Open Modelica, Rust, Telegraf and the required pip dependencies |
| Create | Create FMU from Open Modelica file |
| Execute | Execute the example in the background tmux terminal session |
| Terminate | Terminate the tmux terminal session running in the background |
| Clean | Delete the temporary files |
Run the example
The install script creates the Python virtual environment o5g-venv in the directory of the example, and the execute script activates it from there. The lifecycle scripts can be run from any directory, for example from the directory of the example.
Install
Run the install script by executing
This installs the required apt packages, including Rust, as well as Open Modelica and Telegraf from their own repositories and the required pip packages.
Create
Run the create script by executing
This compiles the Modelica model to a Functional Mockup Unit (FMU) for the correct platform.
Execute
To run the digital twin, execute
This starts all the required components in a single tmux session
called o5g in the background.
To view the running digital twin, attach to this tmux session by executing
To detach, press Ctrl-b followed by d.

The tmux session contains four components of the digital twin:
| Panel location | Purpose |
|---|---|
| Top Left | Sensor simulator generating random location and O2-level data |
| Top Right | Main Digital Twin receives the sensor data and calculates an estimate of how many minutes of air remain |
| Bottom Left | Telegraf to convert between different message formats, also displays all messages between components |
| Bottom Right | TeSSLa monitor raises an alarm if the remaining time is too low. |
Examine the Results
For more mission awareness, use the InfluxDB data visualisation. The file influx-dashboard.json has a dashboard configuration. Log in to the InfluxDB server (usually on port 8086) to import it. A screenshot of the dashboard is given here.

The data is stored in the
o5g->prediction->air-remaining->37ae3e4fb3ea->true->vgiot/dt/prediction
variable of InfluxDB. Besides importing the dashboard configuration
above, you can create custom dashboards from the stored data.
Terminate
To stop all components and close the tmux session, execute
Clean
To remove the temporary files created during execution, execute